18: Holding reminder notes on the plate in your skull

No fewer than seventeen cool magnet tricks, from the irritatingly productive Evil Mad Scientists (I note that they favourited this...).

I've done only a few of these "tricks" - many of them are actually more in the "handy hints" department - myself. I've made homopolar motors, and done a bit of sculpting, and the big scary truncated-pyramid magnet from this old piece is our fridge-pen holder; if a pen has nothing ferromagnetic in it, we just tape a paper clip onto it. I've also got a length of aluminium tubing and a slab of copper for eddy-current braking demos.

The EMSL piece ends with a warning to keep magnets away from your laptop's hard drive, if you're seeing if you can put the computer to sleep with the lid open by putting a magnet on the embedded switch. This is a fair warning; a decent-sized modern rare-earth magnet might indeed be able to damage data on a laptop drive.

But the emphasis is still on the "might", because even the scant centimetre of aluminium and plastic between a laptop drive platter and the outside world is likely to keep magnets far enough away that any not-dangerous-to-humans NIB (neodymium-iron-boron) magnet won't be able to hurt it. The magstripe on a modern credit card has a coercivity similar to that of a hard-drive platter, and you definitely can wreck a card magstripe with a small rare-earth magnet - but the magnet can touch the magstripe, while a drive platter is inside a casing, and the casing is usually inside a computer. And, roughly speaking, the intensity of a magnetic field decreases with the cube of the distance from the centre of the magnet.

(New-fangled perpendicular-recording hard drives apparently have higher-coercivity magnetic coatings than older drives; if so, this ought to make them even more resistant to accidental erasure.)

Generally speaking, you don't have to be too worried about playing with magnets near your PC. Especially now that you probably have an LCD monitor, not a magnet-sensitive CRT that'll need degaussing if you bring a magnet too close.

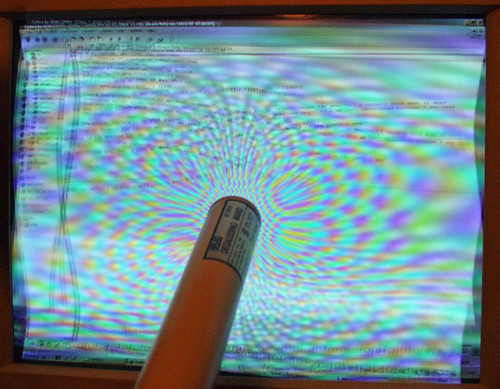
Oh, look! Another chance for me to deploy my cool picture of a monitor being degaussed!

Degaussing a CRT

And now, here's somebody messing up his own monitor, so you don't have to:

Here's someone doing the same thing with a rare-earth magnet, which is so strong that I think it's pulling the shadow mask right into contact with the inside of the screen:

If a shadow mask or aperture grille gets distorted that badly (usually by physical mistreatment of the monitor, not by magnets), it's unlikely to be fixable. The monitor will still work, but it'll now have permanent weird coloured blotches.

(Black-and-white TVs, and monochrome monitors, have no shadow mask and so can't be permanently damaged by a magnet. The field will just pull the image into a funny shape, which will bounce back to normal when you take the magnet away. Only if you somehow manage to magnetise some ferromagnetic component near the tube will any of the distortion stay after the magnet has gone. Fun could be had by putting the big ring magnet off the back of a loudspeaker under someone's Apple II green-screen.)
Rockin' out over SCSI 1

Via Hack a Day:

The creator couldn't get four ScanJet 3Cs at a reasonable price, so the scanner is overdubbed into four voices. But everything else is live - hence, presumably, the less-than-perfect sync between instruments.

Johnny Five is still totally headbanging at four minutes 11 seconds, though.

LED-Brite

A reader writes:

I live in Taiwan, and I just came across a new LED device which seems very cool.

First, here is a link. It's all in Chinese, unfortunately, and I can't read it to translate for you, but there are at least some photos to give you an idea.

'Aurora' LED sign

[Here's a goofy machine-translation, which gives the thing the name "Aurora", which sounds good enough to me. The price, 1699 Hong Kong dollars, is as I write this about $US220.]

Basically, this works like a Lite-Brite, but with LEDs. There is a black PCB, entirely pierced through with holes. It has no wires, and there are no visible electronic components except for the DC input at one corner. You can plug in LEDs on either side, front or back, in any pattern you like. It's powered by either a wall-wart, a small battery pack, or a USB power connector.

A friend of mine here showed it to me tonight, and it was very impressive. Water-resistant, even - he poured a beer all over both sides of one with many lit LEDs, and there was nary a flicker.

Anyway, if you're interested, I could probably find out more about it.

Doug

I immediately, and completely wrongly, picked the Aurora as a cheaper clone of the Bandai Luminodot (dodgy translation), which was all the rage on the gadget blogs a few months ago. Some hipster has presumably bought himself a Luminodot for $US200 delivered on eBay by now, but I sure ain't.

Doug was quick to point out, though, that this thing is not a backlit-plastic-pegs device like the Lite-Brite or Luminodot, but a bunch of little powered breadboard-ish holes, into which you can plug as many or as few LEDs of whatever colour you like, and have 'em all Just Work with no fooling around with supply voltages or current-limiting resistors or fancy driver pucks.

(I think a cheaper version of the Bandai doodad might be makeable with a laptop CCFL backlight panel and little black shutters that open to let light out when you push a peg though them. Or you could do it the Lite-Brite way, and put a new sheet of black paper over the light for the pegs to puncture every time you want to make a new picture.)

Undaunted, I immediately developed total certainty regarding the Aurora's similarity to another light-array gadget.

Peggy 2.0

That gadget is the open-source "Peggy" invented by Evil Mad Scientist Labs, which is now up to version 2, and available as a kit.

The different Peggy versions are capable of various kinds of animation, and can even be used to display (very low-res) video.

The array Doug saw may, like the Peggy, only actually light one row or column of LEDs at a time, but cycle through them too fast for any flicker to be visible. (It may or may not do the same devious multiplexing as the Peggy, and is almost certainly a lot less "hackable".)

The Aurora is clearly being promoted as being useful for commercial signage, as an alternative to the custom-made, ultra-bright LED-array signs that I've seen sprouting around the place.

Doug was under the impression that the retail price "for a board about a foot square" was only around $US30, plus another $US10 for the power supply. That'd make it worth buying just for the amusement value, but doesn't line up with the $HK1699, $US220-ish price on the product page.

Never mind, though; when an odd toy starts being sold on any Web site ending in .tw, its price will probably be in free-fall soon.

The third-smallest hard drive

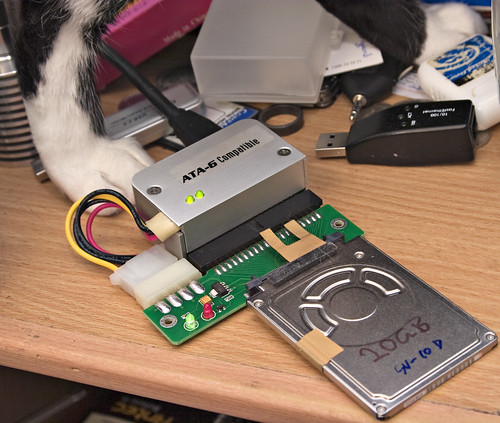
1.8-inch drive, interface adapters, and cat feet

(Don't worry - he's an anti-static cat.)

I had this little "20Gb" 1.8-inch hard drive, as seen in older iPods, just sitting around. It actually has a formatted capacity of only 18.6Gb, but that's still several gigabytes bigger than my "out" directory that contains pretty much everything I've ever written, including pics. So the little drive looked like a good place for me to make another backup of "out".

(I could also use a 16Gb flash drive, which would be a much tougher backup device, and not very expensive - just today, DealExtreme listed a 16Gb Kingston USB drive for less than $US35 delivered. But I already had the little Toshiba, and it's not going to be my only backup of this data.)

I attached the little drive to my computer via two adapters. The thing at the back with the cable plugged into it is the WiebeTech FireWire Super DriveDock that I reviewed back in 2003; the FireWire cable can provide more than enough power to spin up this little drive, so I didn't need to plug in the DriveDock's plugpack.

The circuit board between the DriveDock and the drive is a Toshiba-1.8-inch to parallel ATA adapter. Like other such doodads - CompactFlash-to-PATA adapters like the one I reviewed way back in 2000, for instance - these adapters are now dirt cheap from Hong Kong dealers. EBay's full of 'em, but I got this one for $US3.49 delivered from DealExtreme.

If you're thinking of doing this yourself, because you've got a junked MP3 player or some such with a perfectly good 1.8-inch drive in it, or because you just bought such a drive on eBay for $3, bear in mind that there is more than one kind of 1.8-inch drive. (This information is also important for people who want to replace the drive in their iPod or other small hard-drive MP3 player.)

Two-point-five-inch drives are the normal type used in laptops, and also in pocket-sized portable hard drives. 2.5-inch SATA is also the form factor that many Flash-RAM Solid State Drives use. 2.5-inch PATA and 2.5-inch SATA drives all have the same pinout, regardless of manufacturer, and differ only in height. So you can put pretty much any 2.5-inch device in pretty much any laptop, USB box or what have you, as long as

1: you don't try to mix PATA and SATA (you can get PATA-to-SATA adapters, but there won't be room for one in a laptop or USB-drive-box), and

2: you're not trying to fit one of the uncommon, unusually-thick kinds of 2.5-inch drive into a destination device that only has room for the common 9.5mm-thick kind.

1.8-inch drives come in SATA and PATA versions as well, but the PATA ones - which are the only ones you're likely to find cheap or free in 2009 - come in different flavours.

The two main types of PATA 1.8-incher are Hitachi (née IBM) and Toshiba. Toshibas have a female connector on the back of the drive, and Hitachis have a male. Apart from that I think they're very much the same, so you can probably get PATA adapters that come with two cables and can work with both types of drive. If you're buying a $3.49 adapter, though, make sure it's got the right connector for your drive.

You can also find 1.8-inch drives with one or another kind of zero-insertion-force (ZIF) ribbon-cable connector. Once again, Toshiba and Hitachi have implemented slightly different versions of the same thing. So, again, all you need to plug these into a standard ATA device is a pin adapter (in this case a "contact-pad-to-pin-adapter"), but you have to get the right one. (Here's an adapter to give you a Toshiba 1.8-inch pin-connector from either kind of ZIF 1.8-incher.)

You may also find 1.8-inch drives in disk packages made to slot into a laptop PCMCIA/PC Card slot. I think there'll probably be a standard Hitachi or Toshiba PATA drive in those which you could dig out with a bit of careful surgery, but if I were you I'd leave the drive in its little armoured package and access it via a laptop, or a PC with a PCMCIA-socket card.

(If you want to dig the drive out of a PCMCIA package because you need to bring a dead iPod back to life, and you don't need a zillion gigabytes of storage, I suggest you try a CompactFlash card in a CF-to-Toshiba-1.8-inch adapter instead. Once again, though, remember that newer iPods use the ZIF-connector type of 1.8-incher, which requires a different adapter.)

Amazingly enough, there are two hard-drive form factors that're even smaller than the 1.8.

The only really "standard", widely available type that's smaller than a 1.8 is the jewel-like CompactFlash "Microdrive" (360-degree Quicktime view here). Microdrives are called "1-inch" drives by IBM/Hitachi, I think because that's the approximate diameter of their platters, but Samsung call them "1.3-inch". They're the same size as a standard Type II (thick) CompactFlash memory card, 42.8 by 36.4 by 5mm (about 1.7 by 1.4 by 0.2 inches).

Microdrives were pretty hot stuff back in the day, but even though you can buy an 8Gb Microdrive these days, they've still been made obsolete by bigger and bigger, and cheaper and cheaper, Flash RAM.

The very smallest hard drives ever made even littler, though. They're made by Toshiba, and are 32mm by 24mm by 5mm (about 1.3 by 0.9 by 0.2 inches) and officially called "0.85 inch" devices. Toshiba have managed to pack "4Gb" into one (real formatted capacity about 3.7 "real" gigabytes), as I write this.

The 0.85 drives actually have the exact same height and width as an SD memory card, as used by most digital cameras, though they're more than twice as thick. They're apparently supposed to be for bulk data storage in mobile phones and other small devices, but I don't think they've actually been used for much; Flash RAM has streaked past them, too.

ABS plus celluloid

Yep, that's a Lego movie projector all right. The frame-rate's a bit short of 24fps and the film moves a bit while the light's on - but c'mon! Lego movie projector!

Via TechnicBricks, again. That post also mentions the first TechVideo from this year...

...a vending machine made by the same guy, Ricardo Oliveira.

Next project: Electron microscope

Lego 3D scanner

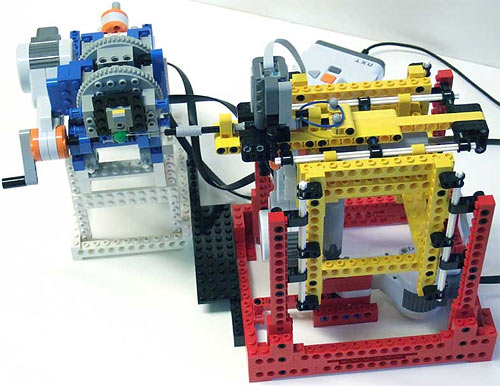
This is a contact-type 3D scanner. Philippe "Philo" Hurbain (co-author of "Extreme NXT", a book about advanced Lego robotics) made it to help him import odd-shaped Lego parts into the LDraw Lego-CAD program.

As you may have noticed, the scanner is itself made out of Lego. I think the only non-Lego parts in it are the actual needle that prods the thing being scanned, and one extra-flexible cable going to a standard NXT light sensor.

All the rest - drive components, sensors, you name it - is 100% Lego. The brain is Mindstorms NXT. Hurbain has made various add-on sensors for Lego robots, but I don't think he's used any of them in this.

Apparently, the new linear-actuator parts are accurate enough for this job, when you drive them with one of the NXT motors, which have built-in position encoders.

More info on Philo's site.

Insert "reamer" joke here

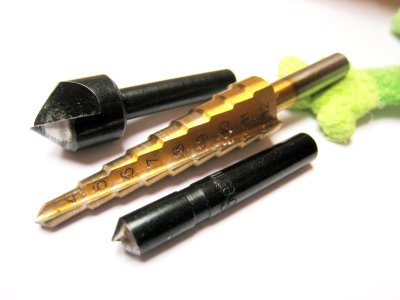
Step drill and countersink

This MAKE: Blog piece is about this page on the subject of making holes in panels which are, and here's the tricky bit, both where, and how big, you want them to be. This is a task for which a step drill is, indeed, very helpful.

I don't actually own any step drills. I cannot imagine why this is, so I just added a set to my eBay sniping list. I do, however, own a couple of tapered reamers, which can achieve much the same thing. They give slightly countersunk hole-sides, which you may not want. But because they're 100% hand operated, they offer finer hole size control, and a much greater risk of repetitive strain injury.

(I used the reamers a lot when getting 80% through construction of my Thing-a-ma-kit, during our holiday.)

The Make piece says "I also sense a nibbler in his future". OK, maybe, for panel work. But I've got a genuine Adel nibbler, and it's almost never been useful for anything at all.

Oh, I've often found myself thinking "Aha! The nibbler will, at last, pay its way!"... but almost every single bloody time, whatever it was I wanted to cut little rectangular bite after little rectangular bite out of was 0.002mm too thick (I believe that's 7.87 RCH, in Imperial units) to fit in the nibbler's jaws.

So back I go to the Dremel or the coping saw or the club-hammer and cold-chisel, again.

Die Legoroboter

(Via.)

Most videos of Lego Great Ball Contraption modules are a bit hard to follow, but this one concentrates on only three modules, so you can get an idea of what's going on.

(The string-quartet Kraftwerk is nice, too.)

The Great Ball Contraption is basically just rules for ball-moving modules that make sure they can connect to each other - like a Technic version of the Lego Moonbase standard.

(Incidentally, you can fmt=18 this clip to get the higher-quality MP4 version, but fmt=22-ing it only seems to give you the basic FLV version at the moment. It doesn't fall back to 18. I knew there was some reason why I didn't do what the cool kids do.)